Saturday, December 22, 2012

Chip Board Note Book

 
My son is a Teachers Assistant at his old high school. So for the Teacher himself, I made up this note book for him. The chip board was chosen to represent the use of the computer in the Autocad field. It actually came out of my FIL's very old computer which he gave us just for this project *he wanted it out of his house anyways :) * The kids had a blast opening it up and disassembling the whole thing. After finding an appropriate chipboard, I used a pair of my very old, heavy duty, ALL METAL, black and silver, 6 " long sissors. *remember those?* to cut it to size. It was a struggle and just about bruised my palms cutting it, but it worked. And as it turned out, not to much cutting had to be done, for the size of chipboard I was hoping to get.
 
Incorporating the old school with the new age keyboards, I chose a designer paper that has old typewriter key bottons.


This note book was otherwise made the same way as this one.


The chipboards background is some of that gray computer ribbon.


Challenges: Simon Says Stamp - Giftspiration

Wednesday, December 19, 2012

Snow Globe Cardinal

Perhaps I should really say, snow box! Recycled acytate , probably from one of my embossing folders. A snowflake folder used for the background, Tim Holtz Bird on a Branch die and the Alphabetical die for the word JOY, and a svg cut for the poinsetta, and of course....snow!
 
Once it was a glued closed, I glued it to some pretty red paper for the background, all on front of a paper bag!


The inside branches are heat embossed with some snowy looking white powder.


Also added some Ranger Stickles for even more sparkle!


Sometimes the bag is the gift but still, I'll time fill the bag with some chocolate!
 
 
Rangers Ink - Challenge Gift Wrap
Simon Says Stamp - Giftspiration
Simon Says Stamp - Anything Christmasy

Monday, December 17, 2012

Key Note Book

 
My Dad sent us all an email stating he didn't want anything for Christmas. Well, how can I do that??? So rather than spending a bunch of money on something he doesn't really want, I thought I'd make him something. Something useful.


I used 3 precut chipboards and glued on some handsome paper, on 3 sides of it. I wanted to make the center piece to have a shadow box effect. Originally I set out to go buy some fun foam to create the depth I needed. But while looking for some at the dollar shop, I found this flexable cork board. It was perfect. Altho all the pieces, chipboard and cork had to be punched with the Zutter to get the binder holes in  them. The cork was too think, so I traced the hole and used an exacto knife to cut them out. It was the trickiest part of the whole project.


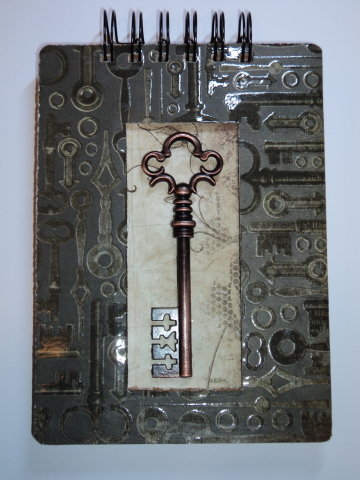
I chose some paper that had the same image as my centerpiece as my 4 piece, for the front cover. The paper came already heat embossed clear giving it that shiny effect. The centerpiece itselfwas bought individually at Michaels, and is a heavy metal.
 
 
2 of the precut chipboards where glued together for the base, and then covered with fancy paper. A piece of the same paper was used as the background for the center piece. I wanted the base to be very strong...to last a lot of usage. The 3rd piece was used as base to the cork on the front cover. 


The center of the cork was cut out with an exacto knife as well as the key paper. Then all glued to the one piece of chipboard.
 
I painted the outside edges of the chipboard pieces and of the cork. I left the inside of the center piece cork showing. Just for fun. *if you prefer to paint it out, do it before you glue the pieces together.*


On the inside, I simply folded a piece of the same paper *again for some strength, and maybe I should add, that the paper itself is of good quality, nice and heavy*, measured the length across, cut and glued it in the middle of the inside. This will hold any note pads he wants to place in there. Sticky notes, or what I've used here....plain note paper, which I also picked up at the dollar store.  So the whole project can be refilled to his desire.
 
 
The backside was given a coat of glue and seal for protection and strength.


The notebook is about 7" long,


Simon Says Stamp Challenge: Giftspiration

Saturday, December 15, 2012

Paper Wreath

Here I took pages from a big old novel, rolled each page and hot glued it to a paper covered round ice cream lid. Each piece of paper was stapled to itself to help with speed.  Rather than gluing each one. Yikes! Then glued to the lid. I started from the outside and worked towards the center. The inner pieces I cut shorter and then glued them in. I also glued in some string on the back of the lid to hang it from. For the center piece I simlply took a poinsetta flower off some christmas decoration. It's about 18" across. It was time consuming, but oh so easy. Got any old books lying around?


So what's my favourite? well there's lot of tools, inks, stamps, technique that top my list, but none of those can be used unless you've got your favourite base - paper!
 
Simon Says Stamp challenge - your favourite

Wednesday, December 12, 2012

Silver and Red

 
Tim Tag - forever I wanted the Reindeer dies. Finally I get to play.You'll find I've used them alot in my cards and my tags. This guy was cut from one of Tims Christmas paper too. And the antlers cut and glued on from his bird on a branch die. I just used a few of the branch twigs from it.
 
For the life of me I can't remember how I colored the background...I've done so many. But it was run thru the cuttlebug with the Sizzix folder.
 
The poinsetta is a svg cut with the cricut.
 
The Versa Mark pen to embellish with some white E. powder to create some snowy corners.
 
A big red bow embellished with one of those foam balls, just cut in half and centered in the bow.


CHallenges: Simon Says Stamp - Tim Tag

Monday, December 10, 2012

Stamped ornie then heat embossed in silver, green for the sentiment. Background using an embossing folder, and a Oval Floral die cut for the frame.
 

Christmas Mailbox

Digi Stamp colored with Copic markers